Have you ever wondered how to create a webpage using a Master and Content model with html, css, & C#? How about how to make your own personal stash of ibuprofen in the comfort of your living room? Ever thought how cool it would be if you could use lasers and tinfoil to increase your wi-fi's output by 350%? Well, if you want to learn the 1st one, I've got you covered. Not so much on the other two.
So, what we're gonna do today is learn the basics of creating a webpage by using a model that includes a "MasterPage" and "Content Pages". This is different from making a 'regular' html/css webpage because the pages themselves don't all include all the usual markup that you may be used to seeing. At least, not all in the same place. Here is a brief overview of what you're going to learn:
Our outline
One. Starting a new Master/Content project.
Too. How the master page looks (and how it works with content pages).
3. How the content pages look (and how they work with the master page).
Fore!. How the css and code-behind pages work with this type of project.
VI. Bonus: Proof that aliens exist.
Section One:
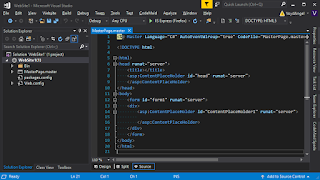
The standard way to create this type of project is actually quite straightforward, as is most of the process of this entire process/method. The first thing you'll want to do is of course open up your favorite IDE, mine being Visual Studio 2017. Choose to make a new project and select the "ASP.NET Empty Web Site"; The exact wording of the project might differ based on what IDE you are using and its version. After your project is opened, right click on the project name (Website1(1) by default), and click Add | Master Page. You will now see... a master page. With some html code and stuff.
 |
| A super exciting screen shot of visual studio! |
Section Too:
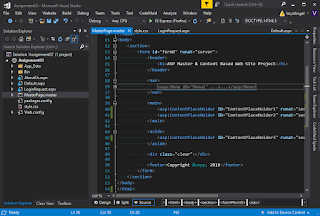
So, what is this master page? Well, if you look closely you will see that it looks pretty much the same as a basic regular html webpage that you might create in a really simple text editor for a very simple website. There are, however, two things that might stick out to your trained and expert eagle eyes: the code that reads something like this "asp:contentplaceholder id="ContentPlaceHolder1" runat="server" "/asp:contentplaceholder". This is half of the linking between master and content pages. "But, why?" you might ask.
What you want to do here is write the basic framework for a web site wherein all the pages will look the same, or at least have a "theme" that they all share. If all the pages will use the same (exact) look/theme, then you can replace the 1st occurrence of the asp:ContentPlaceHolder (the one in the "head" tag section) with your standard css ref link as I have done in the following example. For each other occurrence of the asp:ContentPlaceHolder, you will be able to add whatever you would normally - but we'll worry about that later.
For now, just fill in all the "boiler plate" that you need for your page without any of the actual content - that is, no 's, no div tables, no text - just the basic html code you need to make the page layout how you want it. Also, feel free to add more asp:ContentPlaceHolder tags as necessary, if you copy and paste the one in the main body, it will automatically change/fix the syntax and naming for you to make them usable without errors.
 |
| An incredibly creative website template, if I do say so myself. |
Section 3:
Now that you have a Master page all laid out with framework code for your website, now we will start making content. My content here is rather sparse (don't tell, but all of this is really just for homework credit), but you can obviously get pretty complex here. For example, all my pages have the same h1 heading in the header section/tag of the page, but you could just as easily have a different 'title' there for each page, or even a different Title (from the head section/tag) by using another asp:ContentPlaceHolder there. Anyway, now that all that is done, go over to the solution explorer again and right click on your "MasterPage.master" file - and then click "Add Content Page".
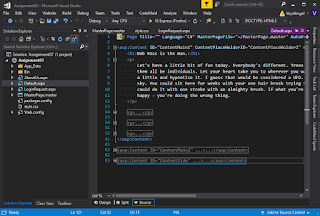
Once done processing, which generally should be very fast, you will see that VS has created a new file for you named "Default.aspx". If you open this file you will notice that for each of your asp:ContentPlaceHolder tags that you set up in your master page, you will now have a "asp:Content" tag with a ContentPlaceHolderID property set to its corresponding ContentPlaceHolder. Each of these will, once the page is rendered from the server, be inserted into its appropriate place in the master page, and then made into a more-or-less standard webpage on the clients machine. Note that these content pages do not need any html tags or framework, they are content only, using only the html content tags necessary for your css to work, such as "p", "h1", etc.
 |
| Maybe I should start posting extra random pictures just to make this more interesting... |
Section Fore!:
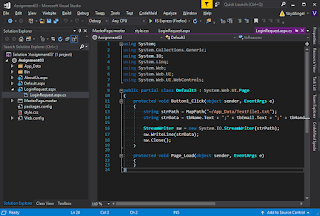
If you right click on the project name and click Add | Style Sheet, you can add a standard css style sheet to the project/web site and use it as you normally would. Just make sure you add the link ref to the head of each content page that should use it, or to the master page if every page will be using the same styles. Furthermore, if you expand the arrow next to any given page (Master or Content) you will find a .cs file associated with each one. This is the code behind file for that given page, and can be used as you would normally use a code behind page for any given web page.
 |
| Look Mom! Codebehind! |
Section VI:
Aliens!
 |
| "It's an older meme sir, but it checks out." |
~The End~
I hope you have enjoyed reading my incredibly helpful, insightful and exciting blog post about making a basic html/css website using the Master/Content model. If you have any questions or comments, please feel free to do the thing with the stuff down below. By the way, here is how you make ibuprofen.
No comments:
Post a Comment